Showing posts with label dark blue. Show all posts

Friday, December 7, 2012

Peacock & French Nails

I love peacock and drawing them out freehand on nails are fun but It's not easy at all. I assure you that peacock nails are super gorgeous and you can never take your eyes off looking at them. That's how beautiful they are.

I made this hand drawn peacock nails using acrylic paint. I first painted the nail with a base color of a soft green color. I also lastly painted the whole art with a gold glitter nail polish to add some awesomeness to it.

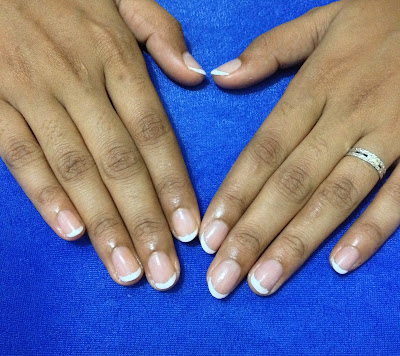
And I also did french manicure for my friend to go along with the peacock nail art.

I loved her pedi and mani in whole. Hope you'll love it too!


Thank for reading and hope you love the pictures!

Thursday, December 6, 2012

Galaxy

I made this galaxy nails ; dark blue glitter nail polish with silver patterns drawn on top of it.
It's one of my simplest mani to do.

here are the pictures .....


Thanks for reading !

Wednesday, October 24, 2012

Tribalastic

Yesterday was my friend, Vinota's birthday. She came over to get herself pampered with some mani on her beautiful long nails. She precisely requested turquoise, blue and purple as it's her favorite colors. She also wanted tribal nail art on her nails.


Not many girl that I know likes playing with colors and doing mani which are not their cup of tea. She wanted tribal nail art on her nails to be different. When I say different, I mean all 10 fingers different.

It was a challenge for me - to create different tribal designs on each of her fingers.

And the ideas just kept flowing to the nails as I started drawing.

Step to do this mani :
1. Paint base coat to nail.
2. Choose/Paint a color that is similar to nail color. I chose a soft beige color.
3. Once completely dried, I did sponging to the nails with three different colors. I used a regular sponge or
    you can use any type of sponge you like to use. Try using different types of sponge to know which one
    you prefer to use.
4. Once the colors from the sponging have dried, use black acrylic paint to make the designs to make a
    tribal. And, use a fine thin brush for this. make dots, triangles and lines  to create tribal design.
5. Once done and dried, apply top coat to secure the design.

 Thanks for reading !


Broken Lane of Silver Moon

I wanted to do something really different than the nail art I have done. I wanted something that look neat and has little wow effect. I love how this mani turned out.

Steps to make this mani :
1. paint base coat.
2. Paint base color with a dark turquoise green polish ( appeared blue color when I took the picture )
3. Then make a half moon shape at the top ( near the cuticle ) of the nail using silver polish.
4. Use a black shatter polish and paint a line on the centre of the nail.
5. Add yellow dots and then use a blue stripper polish to make the outer lines of the shatter lines.
6. Secure mani with top coat.


Thanks for reading !

Sunday, October 14, 2012

Blue & Purple Marble

This post should have came in earlier but then I was caught up with my exams and birthdays. So, Sunday morning here I am blogging my pending posts.

Last Tuesday, my friend brought her good friend over to my place as her friend has come over to Medan for a visit. And she wanted to get her pedi done before she leaves the next day.

I had no idea at first on what I should do for her toe nails. 

Dry marbling is pretty nice, fast, long lasting and pretty awesome too. 

I chose two colors, which are dark royal blue and a beautiful silky purple color. And white for the swirls to made of.

To do this dry marbling is pretty easy. There are two types of dry marbling I came across.

First, you can use a sandwich plastic wrap or any easy to work with plastic wraps or bag. Then paint on the bag few or two if you like to limit them. To create designs, use a toothpick and drag the polish when Its still wet to your desired pattern.As you wait for the marbling pattern to dry, paint a choice of your color with a base coat color. Once the polish on the plastic bag is dried and when the base color is slightly still wet/tacky, cut out or paste the dry marbling that you should easily be able to peel it off. Use tweezers to help you tuck in the sides of the marbling to the nail. Once that is done, protect the nail with a top coat and this will help you to prevent from chipping.

The second version is the one I use and this is much faster process. After applying a base coat and wait for it to dry completely, paint one half of the nail with one color and the other half with another color. Then, quickly use a white or other color that you prefer, place small dots on the still wet polish and use a safety pin or toothpick ans swirl the white dots around the nail and make your desire pattern.

Here's the picture to my dry marbling.


I hope you like the mani. Drop your comments below on what you think of this mani.

Thanks for reading.


Saturday, October 6, 2012

Fusion Peacock

My very first nail art design was using a hair pin and it turned out to look like some sort of peacock feather pattern. I did it for my cultural Indian clothing - Saree.

So, here is the picture of my first nail art picture.


My friend wanted the peacock nail art. And I did something similar but changed a little, added some fusion to it. I really like how the mani turned out. Closed up picture clearly shows the colors used and I just love it.


Tell me what you think.

Thanks for reading .